Accessibility statement
Accessibility statement for Natural Resources...
This is part of the content and publishing manual
An accessible document means:
When starting your document make sure you're using the latest NRW accessible document template which is built into Microsoft Word.
The default styling for all documents are:
When you are writing in Word, always use structural formatting for headings, body text, bulleted lists, numbered lists etc.
These are applied using the 'Styles and Formatting' panel.

You will need to set the document title.
Do this by going to 'File', then 'Info'. On the right-hand side you should see 'Properties'. There you can edit the document properties, including the 'Title'. Change this to the document title you want.
Nearly all users will benefit from a properly formatted 'Table of Contents' providing active links to the various sections of a document. Especially in large documents.
You can create a table of contents by clicking the 'references' tab, then on 'Table of Contents'.
Create a table of contents based on the document's heading structure.
Headers and footers must not contain useful information for readers. Most, if not all of the information within a header or footer is hidden from screen readers.
Logos are allowed in page headers as long as the guidance in regard to graphics and images is followed. Read Add alt text to images, graphs, charts and graphics.
Page numbers are allowed in page footers as long as the numbering is consistent throughout the entire document. Avoid switching between two or more different numbering styles within a document i.e. numbers and letters, or numbers and roman numerals, etc.
The same styling and formatting must be followed by referring to Styles and formatting.
Colour is one of the most powerful and often misused aspects of visual communication.
Just because it looks one way to you when you design your documents and web pages doesn’t mean it will look that way to your audience.
Follow these simple rules:
Instead you should use colour plus bold, colour plus size, colour plus patterns or shapes, or colour plus highlight to show emphasis.
These simple techniques can help improve information access for people in a wide variety of contexts and conditions:
Assistive technology users rely on headings and subheadings to understand and navigate documents. To do this they need to be properly formatted.
To select the appropriate heading text, you need to:
Go to the 'Styles' section, and select the heading you want to use, for example 'Heading 1' or 'Heading 2'.
Headings should not be used:
Empty headings are headings which have no text assigned to them. They are very easy to miss when writing a document and are just as easy to amend.
There are two ways to find empty headings:
1. When hovering over a heading, a triangle symbol will appear to the start of the line. If a triangle appears when hovering over an empty line, this signifies an empty heading;


2. Use the navigation pane to remove empty heading.

You can:
Incorrect headings, or incorrect heading order; is when the heading level is incorrect. The correct order is: Heading 1, Heading 2, Heading 3, etc. It is recommended to not go beyond Heading 3 or Heading 4.
The definitive way to determine if the heading order is incorrect is, whilst the cursor has the heading text selected, within the Home tab under the 'styles' column; the assigned style will show as highlighted/selected.

Pictures should only be included if absolutely necessary.
If you need to include any pictures they should be:
This will make sure screen readers read them in their logical order.
If you want to add a figure, it is recommended to place these above or before your graphics/images.
You will also need to add alt text.
You should not group pictures together because this is not accessible.
If you use several images to represent a whole it may look like one image to you, but screen readers will read each image separately. This may not work for the reader since what you wanted to do was convey just one idea.
You will need to group the images.
You can take a snip of the image, pasting it to your document as an image and adding alt text. Or you can:
Before using charts and graphs, you need to work out whether what you're trying to convey is best done with text, or a chart or graph supported by text. If you can convey the information in a clear succinct way with text, then you probably do not need a diagram.
Any charts and graphs need to be clear and easy to understand. Use high-contrast colours, or monochrome (shades of one colour). Consider using shaped data points or hatching for bars. Using techniques with black and white will mean people won’t need to use coloured toners. You can read further recommended advice on the Microsoft 'Change the shape fill, outline, or effects of chart elements' page.
If you do need to include any charts or graphs etc, it is essential to provide comprehensive alt text that fully conveys all of the information contained within or conveyed by the image.
Always set your chart or graph inline. Go to 'Layout', choose 'Wrap Text' then 'Inline'.
If you want to add a key, it is recommended to place these above or before your charts and graphs.
Alternative text or 'alt text' should be added to images, graphs, charts and graphics. This means screen readers can read the text and describe the image to the users who can’t see the image.
You do not need to include alt text for images and graphics that are purely decorative. In this case tick the box 'marked as decorative'.
The alt text should not be a description of the image or graphic. Instead, you should describe what the image or graphic is telling the reader. What information do you want the reader to gain from looking at the image?
Write in simple, precise language, and keep the explanation brief. Typically, no more than a few words are necessary.
If the alt text is longer than 16 words it should be included in the text of the document.
To add alternative text to your document:
If you’ve not used alt text before, you can also select 'Generate a description for me' to have Microsoft's cloud-powered intelligent services create a description for you. This takes a moment, after which you see the result in the text entry field. Remember to delete any comments Word added there, for example, "Description generated with high confidence."
Links are useful navigational aids.
Sighted users visually scan pages for links to help them find what they're looking for. People using screen readers can pull up a list of all the links on a page.
Links should take people to the related landing page instead of a specific document. This helps avoid frustrating broken links.
If you have no other option but to link directly to a PDF, always make sure your link text tells people they are going to download something and tell them how big it is.
The links must explain to the user what it contains. Using 'read more' or 'click here' doesn’t make sense to the user. It can also be very annoying for screen reader users to listen to a list of the words "to read more”.
You should embed the link within your text. Do not cut and paste the full text of a link into a document like this:
Highlight the text you want to make into a link and use insert – link in the ribbon. It should look like this:
Apply to change an existing abstraction or impoundment licence
This describes where the link leads. And screen reading users won’t have to listen while their screen reader reads every single character of a URL.
You will improve the experience of all your readers when you take care to embed text that clearly explains what information your readers will find when they click on a hyperlink. 'Change an existing abstraction licence' is more descriptive than simply 'abstraction licence'. Never make the user click a link just to find out where it goes.
If you are writing a document that could be printed out, you must spell out the web address in round brackets after the hyperlink. You don't need to include the 'http://'.
Further examples:
Register online for our flood warnings service (naturalresources.wales/flooding/sign-up-to-receive-flood-warnings).
Don't forget you can keep up to date with our flood alerts on Twitter (twitter.com/natreswales).
Tables should only be used to set out data and not for general page layout.
It is important to make sure all tables are accessible to those using screen readers. This helps screen readers to make sense of the data contained in a table.
If you want to add a key, it is recommended to place these above or before your tables.
There are multiple parts to the process of making a table accessible:
To create a header row for your table you need to:
Table titles are recommended to exist outside of the table it represents. This is so that the first row within the table can be properly assigned as the column and row headings.
Figure 1. Bad example of table title placement
| Table Title | ||
|---|---|---|
| Column 1 | Column 2 | Column 3 |
Figure 2. Good example of a table title placement:
Table Title
| Column 1 | Column 2 | Column 3 |
|---|---|---|
| Row 1 | ||
| Row 2 | ||
| Row 3 |
The very first row and/or column are allocated as the table headings. These headings define the information within the table body. Use the table style options to ensure the screen reader can read the table properly.

To set the table style options properly:


To ensure a table is read properly, they must be wrapped/aligned with the text and must fit to the screen width.
To wrap the table in line with the text:
Or you can:
To fit the table to the width of the screen:
We do not use merged cells. Merged cells are multiple cells, within a row or column; which have been merged into a single cell.
There are two types of lists available: Bullet lists, and numbered lists.
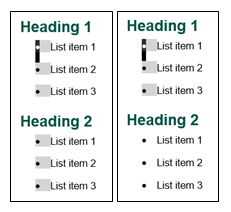
Linked (or connected) listing is a common issue when lists throughout the page, commonly separated by headings; which are linked.
To determine if list items are linked, click an item within the list. All related list items will be highlighted in grey.
To fix the linked lists issue with numbered lists:
or
To fix the linked lists issue with bullet lists:
or
You should not use text boxes or group images or graphics together, as they are not accessible.
You should not include any scanned documents as they tend to be saved as images.
If you do scan any documents, you need to ensure that they are in a word file and not an image file. You will also need to include alt text.
Select 'Layout', then 'Columns' to lay out text in columns.
Never use tables to simulate multicolumn text.
To create a new paragraph, press the Return key once and once only. This means you shouldn’t add more than two spaces between paragraphs.
Similarly, the Tab key or the space bar should never be used to position copy on a page. Doing so is liable to render your copy as gobbledygook when read with a screen reader or when converted to plain text format.
If you finish your text part way down the page and want to move on to the next page, don’t use the 'Return' key or 'Tab' key to move down the page. It makes a series of empty boxes on the page which you can’t see but the screen reader will keep reading them out as ‘EMPTY’. Make a Page Break at the end of your text instead.
Follow the steps below to show or hide the layout markers. Alternatively, you may also use the shortcut 'Alt, H, 8'
Make sure you are in the 'Home' tab of the document
In the column labelled 'Paragraph', click the button with the ¶ symbol.
To insert a page break:
or:
Section breaks are similar to page breaks where they allow the separation of the desired information. Use a section break if you want to format the page layout separate to the rest of the document.
Footnotes should not be used.
Repairing PDFs so that footnotes appear in the right place in the reading order is essential for the content to make sense to a screen reader user. However, it is very time consuming to do.
Footnotes work even less well on mobile phone screens than they do on PCs, for obvious reasons.
You should also remove any links from the footnotes.
In this section you will find some helpful tools to help check that your document is accessible.
Although not entirely necessary, it could be useful for any. Follow the steps below to show or hide the built-in accessibility checker. Alternatively, you may also use the shortcut 'Alt, R, A, 1'
Make sure you are in the 'Review' tab of the document
In the column 'Accessibility', click the button labelled 'Check Accessibility'
Follow the steps below to show or hide the navigation page. Alternatively, you may also use the shortcut 'Alt, W, K'
Make sure you are in the 'View' tab of the document
In the column labelled 'Show', tick the box labelled 'Navigation Pane'
The navigation pane should appear